Assembling the Kikkerland Paper SLR Pinhole Camera
June 30, 2013 4 Comments
I bought this from IkoIko shop at lunch time one day. It was quite a bit of fun putting this together, although some parts of the instructions weren’t clear, and I had to ask my partner several times just to make sure I got it right since the instructions didn’t make sense. But hey! I got there in the end!
All images are © copyright of the photographer. You may NOT replicate, manipulate, modify, or use these images in any way without permission.
The kit


What you need

The instruction booklet calls for double-sided tape, masking tape (black masking tape is best, bur regular masking tape will work), strong paper glue (I used UHU glue). I also use scissors to cut the tapes to fit shapes.
Assembling the Kit
The back cover

This was straight forward, glue/tape the tabs and put it together.
Shooting Zone

This part was still pretty straight forwad, but I somehow still managed to screw it up. I think I zoned out while putting the tapes on and ended up putting them on the wrong side. No dramas though, because the tapes came off okay, it took a little bit of paper with it, which was covered using black Sharpie easily. The copper plate with the tiny hole fits in the middle. It took awhile to center it, but I got there in the end.
View Finder

I thought the details of a hot shoe was quite cute. Other than that, the folding bit on the side was a little hard to fold due to its size. Other than that, it was all straight forward.
Film Bracket & dial
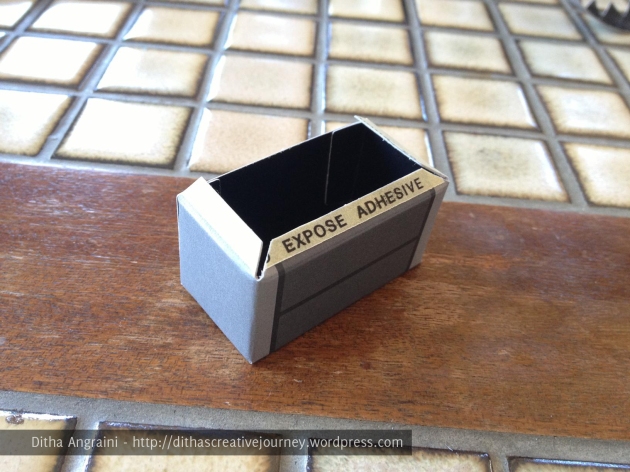
I discovered later on that I don’t think the exposed tabs (shown on picture) actually needed to be taped/glued despite what the instructions said, because this will face the back cover, and you’ll need access to it to insert the film. So I left the tape covered on this part.

The dial goes on top of the film bracket. Was not the easiest shape to form from this material, but then again, this does nothing because this will be glued on the top of the film bracket.
Film Winder

You’d need to glue the black paper to to the wooden stick first (make sure only to glue the top and bottom as film will need to slip through this), insert the stick to the ‘spring’, then punch out the box, put it together, and you’ll get this:

Moving on, you’d put together the ‘key’ and you’ll end up with this:

Again, I found out later on that the exposed tabs don’t actually need the tape/glue because this will also be facing the back cover so you can have access to it while inserting the film, so I’ve left the tapes covered.
The Lens

The lens pretty much is constructed from 3 circular shaped papers with hole in the middle, and this is the only time I used glue. It’s a shame that the tab of the lens hood is creased and bent, otherwise I would have been able to make it round.
Final Product
I’ve left the front panel and shutter as I did the final assembly, because I thought it was more fitting that way. So in this step, you pretty much put all the parts together and then you’re done! So here’s the final product:


Enjoy! :)

Did you ever use your camera to successfully take and develop photos? How did they turn out?
Haven’t got a chance yet :( I’m kinda paranoid that it would fall apart when winding it. Lol. But definitely will try it sometimes.
I wish I’d seen this before trying to put one together myself. I made such a mess of it that the whole thing was ruined.
Oh no! I have to admit though, the instructions wasn’t that clear. I had to ask around a few times just to make sure I got it right, and made mistakes along the way too.